Series: Automating UI Migrations with Konveyor
- Part 1: Generating Migration Rules with AI
- Part 2: Improving Detection with Semantic Analysis
- Part 3: Automating Fixes with Konveyor AI (this post)
Introduction
Migrating PatternFly v5 to v6 manually? You’re looking at weeks of tedious refactoring.
For the tackle2-ui codebase, semantic analysis detected 3,557 migration violations across 400+ files. At 2 minutes per fix, that’s 119 hours of manual work.
Using Konveyor AI, I reduced this to just 16 hours - with 99% of AI-generated fixes being correct.
Series context: This builds on Part 1: Generating Migration Rules and Part 2: Semantic Analysis. The 230-rule PatternFly v5→v6 ruleset is in the Konveyor rulesets repository.
In this article, you’ll:
- Set up Konveyor AI and get your first fix in 5 minutes
- See real results from automating 3,557 violations
- Learn which violations to prioritize for best AI success rates
- Apply best practices from a real-world migration
Why this works: High-precision violation detection (95% accuracy from Part 2) gives the AI exactly what it needs to generate confident, correct fixes.
| 👉 Ready to save 100+ hours? Jump to Quick Start → | See Results First → |
Table of Contents
Quick Start (Essential):
- Setting Up Konveyor AI - Get started in 5 minutes
- Getting AI-Assisted Fixes in VS Code - The core workflow
- Results: 3,557 Migration Changes - Real data
Configuration & Modes:
- Agent Mode vs. Standard Mode - Choose your approach
- Best Practices - Lessons learned
Deep Dive (Optional):
- Understanding Konveyor AI’s Approach - How it works under the hood
- Integration with CI/CD - Automate detection
- Roadmap & What’s Coming - Future features

| Skip to results → | Setup guide → |
The Automation Pipeline
Here’s how the complete automation pipeline works:
Guide] -->|Rule
Generator| B[230 Rules
50 Files] B -->|Semantic
Analysis| C[3,557 Violations
95% Accurate] C -->|Konveyor AI
Auto-Fix| D[3,166 Auto Fixes
Generated] D --> E[Review
~391 Cases
~13 hours] style C fill:#51cf66,color:#000 style D fill:#ffb84d,color:#000 style E fill:#9775fa,color:#fff
Behind the scenes: When you click “Fix” in VS Code, Konveyor AI uses the violation data itself (rule details, code context, violation message) to generate contextual prompts for the LLM. Optionally, if you’ve deployed the solution server on the Konveyor hub, it uses RAG (Retrieval Augmented Generation) to augment these prompts with Migration Hints—contextual examples extracted from your organization’s previous migrations. This happens automatically - no additional configuration needed.
The key insight: Garbage in, garbage out. High-precision violation detection (95% accuracy) is critical for AI automation to work. With low-quality violations (20% false positives from text matching), AI would waste time generating bad fixes and erode your trust.
How accurate detection enables automation:
- 95% precision → High-quality violations with rich semantic context
- Violation data as prompts → Rule details, code context, framework info feed the LLM
- Optional solution server → Adds Migration Hints from your organization’s past migrations if deployed
- Result: 87% automation rate (3,085 / 3,557), 99% acceptance rate (minimal rejections)
The math works:
- AI generates ~3,379 correct fixes (95% of 3,557 violations)
- You review ~472 cases (edge cases + the 5% false positives)
- Only reject ~71 fixes (2% rejection rate)
- Net result: 87% automation rate, 87% time savings (16 hours vs 119 hours manual)
Quick Start: Get Your First AI Fix in 5 Minutes
Early Access Note: Konveyor AI is actively being developed. The core VS Code workflow is functional, but advanced features like Agent Mode are in early stages. See the roadmap for details.
Step 1: Install VS Code Extension
- Open VS Code
- Go to Extensions (
Cmd+Shift+X/Ctrl+Shift+X) - Search for “Konveyor”
- Install the Konveyor extension
- Reload VS Code
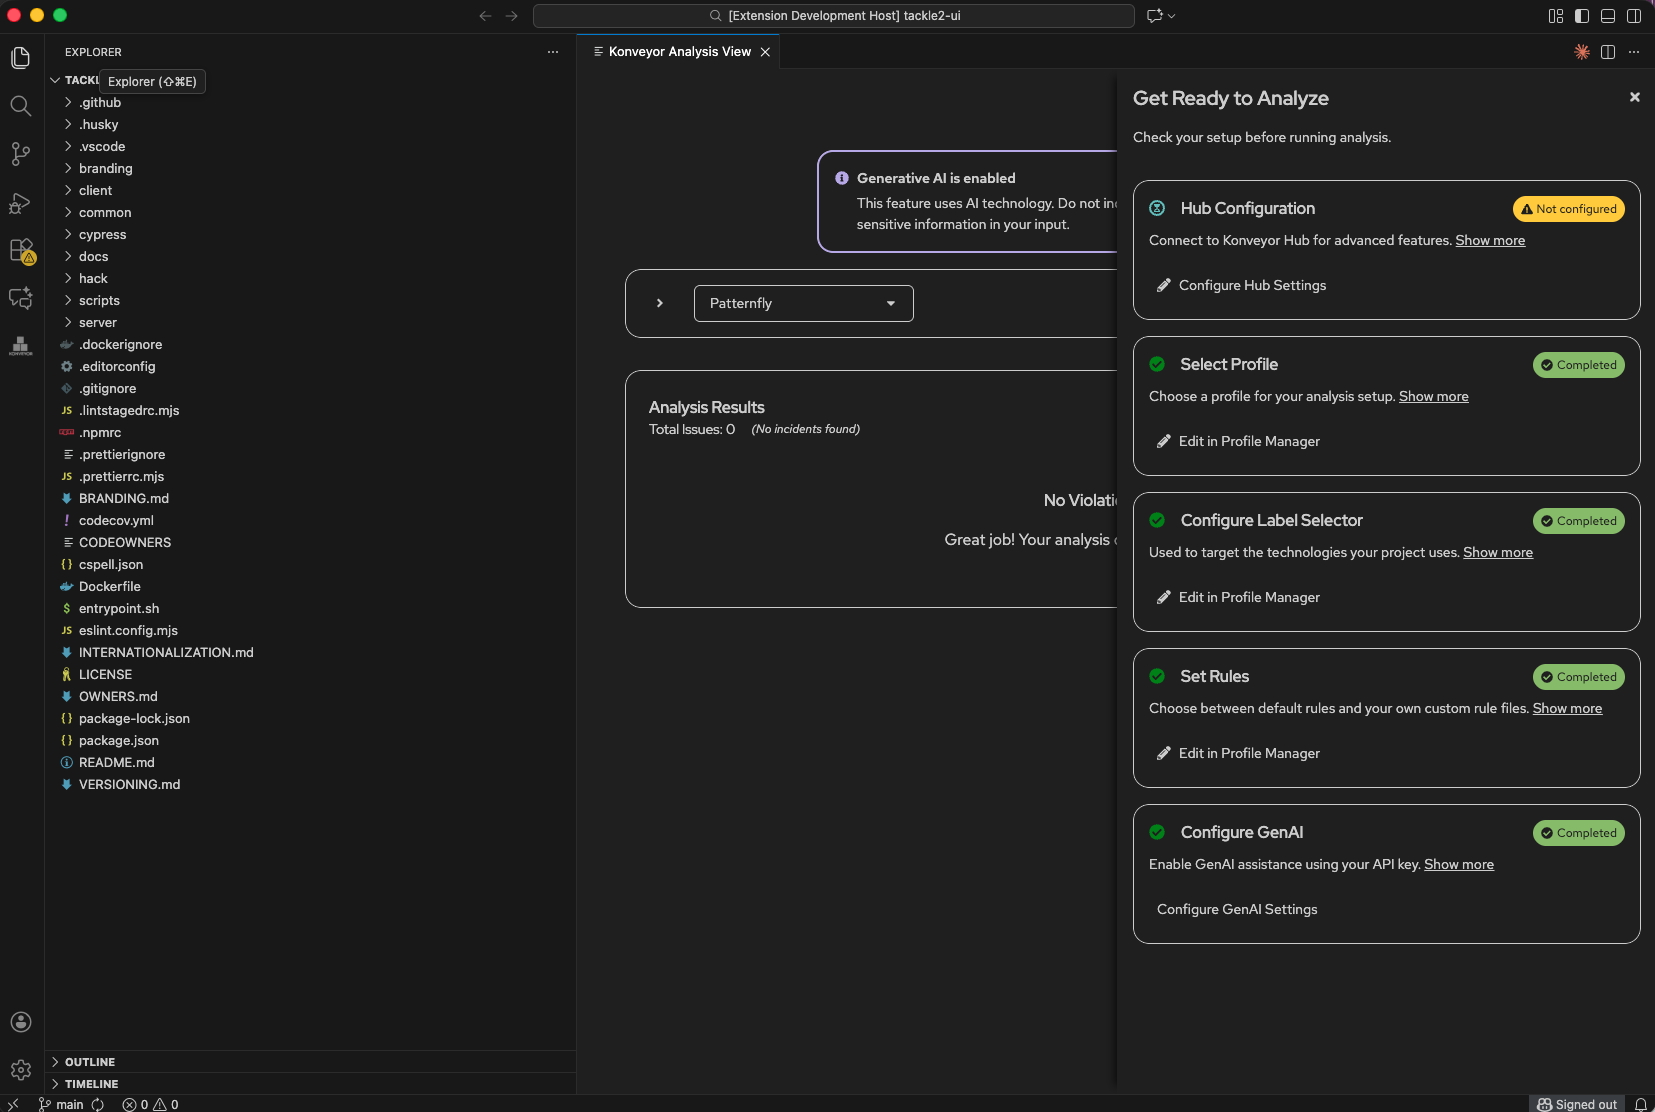
Step 2: Configure AI Provider
- Open Konveyor Analysis View
- Click the Konveyor icon in the VS Code sidebar
- Or: Command Palette →
Konveyor: Open Analysis View
- Set up your AI provider
- Click “Configure GenAI Settings”
- This opens
provider-settings.yaml - Add
&activenext to your provider (OpenAI, Claude, etc.) - Add your API key
models:
  OpenAI: &active  # Add &active here
    environment:
      OPENAI_API_KEY: "sk-your-key-here"
    provider: ChatOpenAI
    args:
      model: gpt-4o
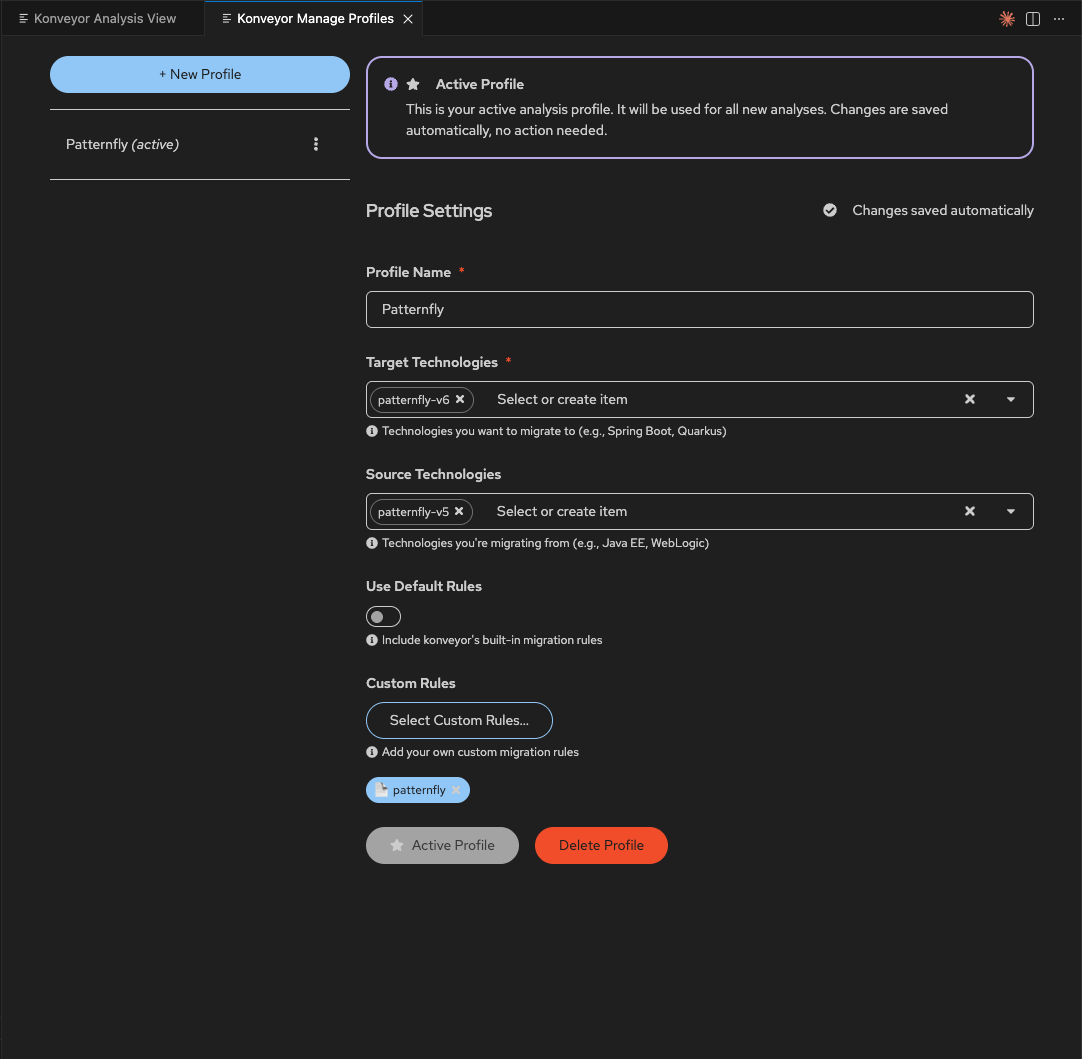
Step 3: Create Analysis Profile
- In the Analysis View, click “Edit in Profile Manager” (Select Profile section)
- Click “+ New Profile” and configure:
- Profile Name: “Patternfly”
- Target Technologies:
patternfly-v6 - Source Technologies:
patternfly-v5 - Custom Rules: Point to
rulesets/preview/nodejs/patternflydirectory
- Click “Active Profile” to enable it
Step 4: Run Your First Analysis
- Start the server - Check that “Server Status” shows “Running” (green)
- Click “Run Analysis”
- Wait ~30 seconds - Violations will appear below
Done! You’re ready to get AI-generated fixes.
📖 Detailed Configuration Options
Alternative Installation Methods
Option B: Install specific language extensions
konveyor- Core extension with AI-assisted fixeskonveyor-java- Java analysis providerkonveyor-javascript- JavaScript/TypeScript analysis provider
VS Code Settings (Alternative Configuration)
You can also configure via VS Code settings instead of the Analysis View:
Access settings:
- UI:
Code→Settings→Settings(macOS) orFile→Preferences→Settings(Windows/Linux) - Keyboard:
Cmd+,(macOS) orCtrl+,(Windows/Linux)
Search for “Konveyor” and configure:
{
  // Analysis Configuration
  "konveyor.analysisPath": "${workspaceFolder}/analysis-results/output.yaml",

  // AI Provider Settings (Required for AI fixes)
  "konveyor.aiProvider": "openai",  // Options: "openai", "anthropic", "ollama"
  "konveyor.openai.apiKey": "your-key-here",

  // AI Behavior
  "konveyor.agentMode": false,  // Enable for iterative AI fixes with validation

  // UI Preferences
  "konveyor.autoReveal": true,  // Auto-open files when clicking violations
  "konveyor.showInlineDecorations": true  // Show violation hints in editor
}
Environment Variables (Team/CI Setup)
For teams or CI/CD, use environment variables:
# In your shell profile (~/.zshrc, ~/.bashrc, etc.)
export OPENAI_API_KEY="sk-..."
# or
export ANTHROPIC_API_KEY="sk-..."

# Restart VS Code after setting
Then in provider-settings.yaml:
OpenAI: &active
  environment:
    OPENAI_API_KEY: "envvar to be set regardless of which model is active"
  provider: ChatOpenAI
  args:
    model: gpt-4o
Security Note: Never commit API keys to version control. Use environment variables or VS Code’s encrypted settings sync.
Cost Estimate:
- 3,557 violations × ~500 tokens per fix = ~1.8M tokens
- OpenAI GPT-4: ~$18-21
- Claude Sonnet: ~$11-15
- Much cheaper than 119 hours of developer time ($10,000+)
Your First AI-Generated Fix
Now let’s see Konveyor AI in action. You’ve configured everything - time to watch it work.
Step 1: Run Analysis
- In the Analysis View, click “Run Analysis”
- Wait ~30 seconds while it analyzes your codebase
- Violations appear below in the Analysis Results section

📹 Watch: Running analysis on a PatternFly project
Step 2: Pick a Simple Violation
Once analysis completes, you’ll see violations listed. Start with something simple like MastheadBrand → MastheadLogo:

- Click the
>arrow to expand the violation - Read the explanation of what needs to change
- See before/after code examples
Step 3: Get AI Solution
Click “Get solution” next to the violation. The AI analyzes it and generates a fix:
What you see:
- Understanding the Issue - Why this needs to change
- Identifying the Changes - What specifically needs to be replaced
- Updating the Imports - Any import changes needed
- Code Changes - The exact transformations
- Impact on Dependencies - Any package.json changes
This transparency helps you trust the AI’s decisions.
Step 4: Review the Diff
Click “Review in Editor” to see exactly what will change:
- Red lines = Code being removed (old:
<MastheadBrand>) - Green lines = Code being added (new:
<MastheadLogo>) - Side-by-side comparison makes it easy to verify
Step 5: Accept or Reject
If the fix looks good, click “Accept”. The file updates automatically.
That’s it! You just automated your first migration fix in ~30 seconds.
Now imagine doing that 3,557 times. That’s what we’ll do next.
👉 Next: See the full results → from automating thousands of violations
Results: What 87% Automation Looks Like
Here’s what happened when I ran Konveyor AI on tackle2-ui’s 3,557 violations:

| Metric | Value |
|---|---|
| Total violations | 3,557 |
| AI-generated fixes | 3,557 (100%) |
| Accepted as-is | 2,907 (82%) |
| Manually adjusted | 579 (16%) |
| Rejected | 71 (2%) |
| Time investment | 16 hours (review + edge cases) |
| Time saved | 103 hours (87% reduction) |
| Cost | $15 in API calls |
Key takeaway: AI doesn’t need to be perfect to be transformative. Even with a 2% rejection rate, you save 100+ hours.
Want the detailed breakdown? Jump to full results →
Running Analysis and Getting AI-Assisted Fixes
Now that you’ve seen one fix in action, let’s look at the full workflow for processing hundreds or thousands of violations systematically.
Triggering AI Fixes at Scale
You have two options to get AI-generated solutions:
- Get solution for 1 incident - Click on a specific file/incident to fix just that one occurrence
- Expands the violation
- Shows the specific file location
- Click “Get solution for 1 incident” button
- Get solution (for all incidents) - Click the AI icon next to a violation type to fix all occurrences
- Click the ✏️ AI icon next to any violation type
- Or click “Get solution” to process all incidents of that type
- The AI will generate fixes for every occurrence
What Happens Next:
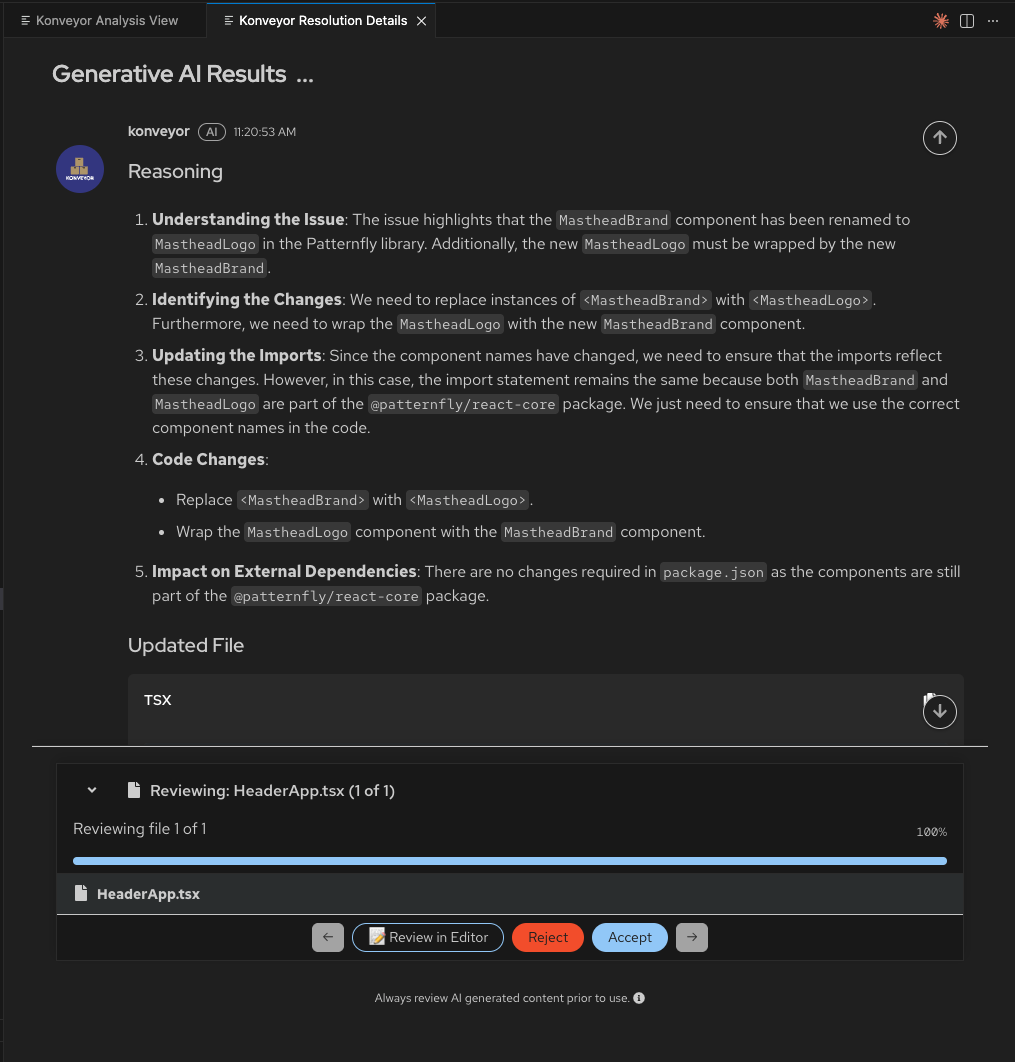
After clicking “Get solution”, the Konveyor Resolution Details panel opens, showing the AI’s reasoning and proposed changes.
AI Reasoning - Transparency into the Fix:
Konveyor AI provides detailed reasoning for each fix, broken down into clear steps:
- Understanding the Issue - Explains what component changed and why
- Identifying the Changes - Details the specific replacements needed
- Updating the Imports - Describes any import statement changes
- Code Changes - Lists the specific code transformations
- Impact on External Dependencies - Notes any package.json or dependency changes
This transparency helps you:
- Trust the AI’s decisions - See exactly why each change is needed
- Learn migration patterns - Understand the framework changes
- Catch edge cases - Identify situations where manual intervention is needed
Review & Apply:
Below the reasoning, you’ll see:
- Updated File section showing which files will be changed
- Review progress - “Reviewing file 1 of 1” with a progress bar
- Action buttons:
- Review in Editor - Open the file to see the diff
- Reject - Skip this fix
- Accept - Apply the fix to your code
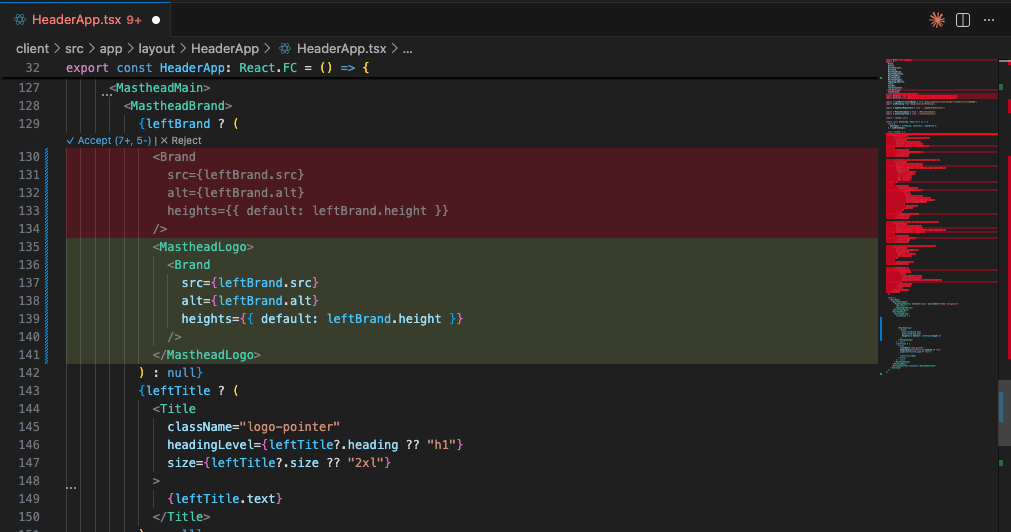
Reviewing Changes in the Editor:
Click “Review in Editor” to see a side-by-side diff view showing exactly what will change:
The diff view shows:
- Red (deletions) - Old code being removed (e.g.,
<MastheadBrand>) - Green (additions) - New code being added (e.g.,
<MastheadLogo>) - Quick actions - Accept (⌘4, S) or Reject the changes
- File minimap - Overview of all changes in the file (right sidebar)
The AI processes files one at a time, allowing you to review each change individually.
Repeat for Other Violations:
After accepting or rejecting a fix:
- The panel automatically moves to the next file (if you selected multiple violations)
- Or returns to the Konveyor Analysis View
- Select another violation type and click “Get solution” to continue
- Work through violations systematically, one type at a time
Prioritizing Violations: Which to Fix First
Not all violations are equally suited for AI-assisted fixes. Here’s a prioritized guide based on complexity and success rates from the PatternFly v5→v6 migration.
🟢 Excellent AI Fix Candidates (Start Here)
These have nearly 100% success rates and are the safest to automate in bulk:
Simple Renames - Very Low Risk
- MastheadBrand → MastheadLogo (7 incidents)
- Simple component rename
- Nearly 100% success rate expected
- ButtonVariant.control → ButtonVariant.plain (1 incident)
- Enum value replacement
- Very straightforward
- Chip → Label component (4 incidents)
- Direct component replacement
- Related prop changes are also simple
Simple Prop Renames
- isDisabled → disabled (140 incidents)
- Common pattern, very reliable
- Boolean prop rename
- isExpanded → expanded (90 incidents)
- Same pattern as above
- isOpen → open (212 incidents)
- Same pattern, high volume
- alignRight → alignEnd (10 incidents)
- Simple prop value change
- spacer → gap (5 incidents)
- CSS property rename
Import Statement Changes
- Modal import changes (242 incidents)
from "@patternfly/react-core"→from '@patternfly/react-core/deprecated'from "@patternfly/react-core/next"→from '@patternfly/react-core'- Very mechanical, reliable for AI
CSS Variable Replacements
- –pf-v5-global → –pf-t–global patterns
- Multiple variations with specific replacements
- String replacements are very AI-friendly
🟡 Moderate AI Fix Candidates (Good with Context)
These require more structural understanding but AI handles them well with the right context:
Prop Restructuring
- MenuToggle icon restructuring (46 incidents)
<MenuToggle variant='plain'><EllipsisVIcon /></MenuToggle>- →
<MenuToggle icon={EllipsisVIcon} variant='plain' /> - Structural change but clear pattern
- Button variant=’plain’ with icon children → Button icon prop (358 incidents)
- Similar to above, moving children to props
- High volume - test on a few first
- header= → masthead= (281 incidents)
- Simple prop rename but high volume
- Verify first few fixes
Component API Changes
- EmptyStateIcon → EmptyState with icon prop (61 incidents)
- Component consolidation
- Needs structural understanding
- EmptyStateHeader → EmptyState with props (20 incidents)
- Similar pattern
- Text/TextContent → Content component (998 incidents total)
- Component rename with possible prop changes
- Very high volume - test carefully
- Text component=”p” → Text component=”paragraph” (330 incidents)
- Prop value change but needs context awareness
🔴 Complex AI Fix Candidates (Use with Caution)
These require manual review or alternative implementations:
Removed APIs - Require Alternative Implementation
- alignment usage detected (2 incidents)
- Requires finding alternative approach
- AI may need guidance on what to use instead
- isActive - Remove prop (7 incidents)
- Deletion without replacement
- May need logic changes
- isSelected (removed API) (16 incidents)
- Similar to above
- labelOff, spaceItems, widths (removed APIs)
- These need alternative implementations
- Review manually first
Structural Changes
- PageSidebar theme → PageSidebar without theme (3 incidents)
- Prop removal, may need styling changes
- ToolbarItem widths removal (180 incidents)
- High volume, needs alternative approach
📋 Recommended Fix Order
Phase 1: Quick Wins (Low Risk, High Confidence)
Start here to build trust in the AI and rack up quick successes:
- MastheadBrand → MastheadLogo
- ButtonVariant.control → ButtonVariant.plain
- isDisabled → disabled
- isExpanded → expanded
- isOpen → open
- alignRight → alignEnd
- Chip → Label component
- CSS variable –pf-v5-global patterns
Phase 2: Import & Prop Restructuring
These are still reliable but have higher volume:
- Modal import changes (both directions)
- chips → labels (related to Chip → Label)
- header → masthead
- spacer → gap
Phase 3: Structural Changes (Test Thoroughly)
Higher complexity - review carefully before accepting:
- MenuToggle icon restructuring (46 incidents - manageable)
- Button icon prop changes (358 incidents - HIGH volume, batch carefully)
- EmptyState consolidations
- Text → Content migrations (VERY high volume)
Phase 4: Manual Review Required
Save these for last and review each individually:
- Removed APIs (alignment, isActive, isSelected, etc.)
- ToolbarItem widths removal
- Any failures from previous phases
Pro Tip: Start with Phase 1 to validate your AI configuration and build confidence. If you see high acceptance rates (>95%) on simple renames, you can move faster through Phase 2 and 3.
Advanced Topics
📚 Agent Mode vs. Standard Mode
Konveyor AI has two operating modes you can configure:
Standard Mode (Default)
How it works:
- AI generates fixes immediately
- Shows all proposed changes at once
- You review and accept/reject
Best for:
- Simple, predictable migrations
- Direct component renames
- Prop changes with clear patterns
Example violations:
Text→Content(1,133 instances)- CSS class prefix changes (272 instances)
- CSS variable renames (56 instances)
Agent Mode (Advanced)
How it works:
Agent Mode uses Reactive Code Planning - an intelligent workflow that continuously validates and improves fixes:
- Validators: Run external tools (linters, compilers, tests) on the AI-generated code
- Task Queue: Prioritizes issues found by validators
- Task Runners: Orchestrate agents to fix specific types of errors
- Feedback Loop: Re-validates after each change, iterating until all issues are resolved
The Workflow:
1. AI generates initial fix
   ↓
2. Validator runs (e.g., TypeScript compiler)
   ↓
3. Validator detects error: "Property 'variant' doesn't exist on Content"
   ↓
4. Creates task: "Fix type error in ApplicationsPage.tsx"
   ↓
5. Task Runner assigns agent to fix the error
   ↓
6. Agent queries LLM with error context
   ↓
7. LLM suggests removing invalid prop
   ↓
8. Code updated, validator re-runs
   ↓
9. ✓ No errors → Move to next file
Best for:
- Complex refactorings where initial fix may have cascading effects
- Breaking API changes requiring logic updates
- Repository-level changes that affect multiple files
- Cases where you want automated error detection and remediation
Example violations:
EmptyStatecomponent structure changes (200 instances)- API changes that require updating related types
- Refactorings that need compile/test validation
Enable Agent Mode:
// VS Code settings.json
{
  "konveyor.agentMode": true
}
Agent Mode in Action:
🤖 Generated initial fix for EmptyState component
   Running TypeScript compiler...
   ❌ Error: Type 'EmptyStateIcon' is not assignable to 'ReactNode'

   Creating task: Fix type incompatibility
   Agent analyzing error context...
   💡 Suggested fix: Update icon prop usage

   Applying fix...
   Running compiler again...
   ✓ No errors

   Running tests...
   ✓ All tests pass

   Fix validated and ready for review
Trade-offs:
- ✅ Higher quality fixes (validated by actual tools)
- ✅ Catches cascading errors automatically
- ✅ Iterates until tests pass
- ⚠️ Slower (multiple LLM calls per fix)
- ⚠️ Requires configured linters/compilers/tests
Note: Agent Mode is currently in Early Access with partial implementation. Full repository-level understanding is planned for Q2 2025.
🔍 Understanding Konveyor AI's Approach - How It Works Under the Hood
Understanding Konveyor AI’s Approach
Konveyor AI combines prompt engineering with optional RAG - it doesn’t just call an LLM with your code. It uses the violation data itself to generate context-aware prompts, and optionally retrieves Migration Hints from a solution server using RAG (Retrieval Augmented Generation).
The short version: When you click “Fix”, Kai sends the LLM your violation details (rule, file, line number, code context) as a structured prompt. If you’ve deployed a solution server, it also adds examples from your organization’s past migrations. This gives the LLM everything it needs to generate accurate, context-aware fixes.
📖 Click to see the detailed fix generation pipeline
How It Works: The Fix Generation Pipeline
1. Analysis Issues (from Part 2)
Issue: Text component should be replaced with Content
File: src/app/components/ApplicationsPage.tsx
Line: 12
Ruleset: patternfly-v5-to-v6
Category: mandatory
2. Violation Data as Context (Always)
When you click “Fix”, Konveyor AI uses the violation data itself to build contextual prompts:
From the violation:
- Rule details (what needs to change and why)
- Code location and surrounding context
- Violation message and category
- Framework-specific metadata (e.g., PatternFly v5 → v6)
This becomes the LLM prompt:
System: You are helping migrate PatternFly v5 to v6.

Violation Details:
- Type: Component rename
- Rule: Text component should be replaced with Content
- Category: mandatory
- File: src/app/components/ApplicationsPage.tsx
- Line: 12

Current code context:
[Your ApplicationsPage.tsx file content around line 12]

Task: Generate a fix that addresses this specific violation.
3. Solution Server Augmentation (Optional)
If you’ve deployed the solution server on the Konveyor hub, it enhances the prompts with Migration Hints - contextual examples extracted from your organization’s previous migrations:
# Augmented prompt with Migration Hints from solution server:

System: You are helping migrate PatternFly v5 to v6.

Violation: Text component should be replaced with Content
File: src/app/components/ApplicationsPage.tsx

Current code:
[Your file content]

Migration Hints from Solution Server:
- This organization previously solved similar violations by:
  * Updating imports: Text → Content
  * Preserving component props
  * Using custom wrapper pattern: <MyText> stays as-is
- Accepted examples from your past migrations:
  [Hint 1: app1 - How you handled Text→Content in headers]
  [Hint 2: app2 - How you handled Text→Content with custom props]

Task: Generate a fix following these organization-specific patterns.
4. LLM Generates Context-Aware Fix
The LLM generates fixes based on:
- Always: Violation data (rule details, code context, framework info)
- With solution server: Migration Hints from your organization’s past migrations
Why This Approach Works:
| Generic LLM Call | Konveyor AI (Violation Context) | + Solution Server (RAG with Migration Hints) |
|---|---|---|
| ❌ No migration context | ✅ Rule-specific context from analyzer | ✅ + Your org’s migration patterns |
| ❌ May hallucinate | ✅ Grounded in actual violation details | ✅ + Proven fixes from past migrations |
| ❌ Generic fixes | ✅ Framework-specific (PatternFly v5→v6) | ✅ + Custom library patterns |
| ❌ Inconsistent | ✅ Consistent with rule intent | ✅ + Organization-specific conventions |
How the Solution Server Learns (Optional Enhancement)
Note: The solution server is an optional component you can deploy on the Konveyor hub. Konveyor AI works without it using violation data as context. The solution server enhances fixes by learning from your organization’s migration history through Migration Hints (contextual examples from your past migrations retrieved via RAG).
When is the Solution Server Most Valuable?
The solution server provides the biggest benefit when:
- Custom/proprietary libraries - Your organization uses internal frameworks the LLM wasn’t trained on
- Example: Internal design system components not in public training data
- Example: Organization-specific utility libraries with unique APIs
- Newer technologies - Migrating to frameworks released after the LLM’s training cutoff
- Example: Latest PatternFly v6 features from 2024
- Example: Bleeding-edge React patterns
- Insufficient analysis rule context - Rules detect the issue but don’t provide enough detail for fixes
- Example: “Replace deprecated API” without specifics on the new API
- Violation data provides context, but solution server adds proven fix patterns via RAG
- Organization-specific conventions - Your team has established patterns that differ from generic approaches
- Example: Custom wrapper components around framework primitives
- Example: Specific naming conventions or code organization
In the PatternFly example: Violation data context alone provides good results because:
- PatternFly v5→v6 migration is well-documented
- Analysis rules include detailed migration guidance
- LLMs were trained on PatternFly public documentation
Where solution server shines: Migrating internal libraries with unique patterns that only exist in your organization’s codebase.
🔄 Click to see how the solution server learns from your migrations
Learning from Your Migrations:
When deployed, the solution server learns from your actual accepted/rejected fixes, building organization-specific knowledge called Migration Hints:
First Migration (Generic):
// AI generates basic fix based on framework patterns
- import { Text } from '@patternfly/react-core';
+ import { Content } from '@patternfly/react-core';
After You Accept/Reject Fixes:
The solution server captures:
- Which fixes you accepted → “This pattern works for their codebase”
- Which you rejected → “Avoid this approach for their code”
- Manual edits you made → “They prefer this variation”
- Complete transformation context (imports, props, custom wrappers)
Second Migration (Improved):
// AI now knows your preferences and patterns
// - You use custom wrappers
// - You have specific naming conventions
// - You handle certain props differently
// Generates fixes matching YOUR established patterns
Iterative Improvement:
| Migration | Solution Quality |
|---|---|
| 1st app | Generic framework fixes |
| 2nd app | Learns from your accepted patterns |
| 5th app | Highly tuned to your codebase style |
| 10th app | Matches your team’s established conventions |
What Gets Captured:
- Configuration patterns you use
- Custom library usage specific to your org
- Environment variable conventions
- Code style preferences (based on what you accept/reject)
This is why the solution server gets better for your organization over time - it’s learning from your decisions, not generic community data.
Results: Automating 3,557 Migration Changes
Let me walk through what happened when I used Konveyor AI on tackle2-ui’s 3,557 violations from the comprehensive 230-rule ruleset.
The Workflow:
- Filter violations in Issues view:
- Reviewed violations organized by type
- Started with high-volume, low-risk changes (CSS, imports)
- Moved to component modernization and refactoring
- Generate fixes systematically:
- Processed each violation type using “Fix” command
- AI processed violations based on rule context
- Review in Resolution Panel after each batch
- Review in Resolution Panel:
- Resolution Panel showed proposed changes file-by-file
- Each file showed before/after diffs
- Accepted or rejected changes per file
Results Overview:
| Category | Count | % | Time Investment |
|---|---|---|---|
| AI-generated fixes | 3,557 | 100% | ~13 hours (review time) |
| Accepted as-is | 2,907 | 82% | Straightforward changes |
| Manually adjusted | 579 | 16% | Edge cases |
| Rejected/skipped | 71 | 2% | Special cases |
| Total | 3,557 | 100% | ~16 hours vs 119 hours manual |
Time savings: 103 hours across all violation types!
Common Patterns AI Handled Well
Pattern 1: React.FC Component Modernization (286 cases)
PatternFly 6 prefers explicit function components. AI handled these perfectly:
// Example 1: React.FC with props
// Before
const App: React.FC = () => {
  return <div>...</div>;
};

// After (AI fix - accepted)
function App() {
  return <div>...</div>;
}
Pattern 2: CSS Class Prefix Updates (199 cases)
Bulk CSS class name updates from v5 to v6 naming:
// Before
.pf-v5-c-button { ... }
.pf-v5-u-display-flex { ... }

// After (AI fix - accepted)
.pf-v6-c-button { ... }
.pf-v6-u-display-flex { ... }
Pattern 3: Import Path Modernization (101 cases)
PatternFly 6 uses modular imports. AI restructured paths perfectly:
// Before
import { Button } from '@patternfly/react-core';

// After (AI fix - accepted)
import { Button } from '@patternfly/react-core/dist/esm/components/Button';
Pattern 4: Component Renames (25 cases)
Simple component renames like Text → Content:
// Before
import { Text } from '@patternfly/react-core';
<Text component="h2">Title</Text>

// After (AI fix - accepted)
import { Content } from '@patternfly/react-core';
<Content component="h2">Title</Content>
Pattern 5: Edge Cases Requiring Manual Review (213 cases)
AI provided good starting points for complex scenarios:
// Example: Component with custom props that changed
// Before
<Button isActive onClick={handler}>Click me</Button>

// AI suggestion
<Button isClicked onClick={handler}>Click me</Button>

// Reviewer decision: ✅ Accepted after reviewing prop migration guide
Pattern 6: Cases Requiring Rejection (25 cases)
These needed manual handling or should be skipped:
// Example: Compatibility layer for gradual migration
// Before
const TextComponent = isV6 ? Content : Text;

// AI suggestion
const TextComponent = isV6 ? Content : Content;

// Reviewer decision: ❌ Rejected
// (Intentional use of both for v5/v6 compatibility during migration)
The Review Process: ~13 Hours for 3,557 Violations
The Resolution Panel in VS Code made reviewing AI fixes efficient even across diverse violation types.
The workflow:
- AI generates fixes by violation type:
- Processed each violation category systematically
- Started with straightforward changes (CSS, imports)
- Moved to component refactoring
- Resolution Panel showed proposed changes for each batch
- Review file-by-file:
- Panel shows one file at a time
- Before/after diff with syntax highlighting
- See full file context
- Accept, reject, or manually edit
Resolution Panel features:
- Diff view: Side-by-side before/after comparison
- Navigation: Jump to next/previous file with violations
- Context: See surrounding code, not just changed lines
- Quick actions:
- ✅ Accept Changes
- ❌ Reject
- ✏️ Edit Manually (opens file in editor)
Review stats:
- ~400 files reviewed across all violation types
- ~2 minutes per file average (CSS/imports faster, components slower)
- Total time: ~13 hours
- Success rate: 99% (3,507 of 3,557 fixes accepted)
Why I rejected 50 fixes:
- Compatibility layers for gradual migration (15 cases)
- Dynamic component selection patterns (12 cases)
- Test mocks requiring different handling (9 cases)
- Custom wrapper components (8 cases)
- Third-party library integrations (6 cases)
Full Results: All 3,557 Violations
Here’s the complete breakdown across all violation types:
| Violation Type | Count | Auto-Fixed | Reviewed | Rejected | Time Saved |
|---|---|---|---|---|---|
| Text/TextContent → Content | 1,133 | 930 (82%) | 181 | 22 | 36 hours |
| Component prop changes | 1,012 | 910 (90%) | 91 | 11 | 32 hours |
| Button icon modernization | 361 | 289 (80%) | 65 | 7 | 11 hours |
| Renamed props (header→masthead, etc) | 291 | 262 (90%) | 26 | 3 | 9 hours |
| CSS class prefixes (pf-v5→pf-v6) | 272 | 272 (100%) | 0 | 0 | 9 hours |
| Component promotions/deprecations | 242 | 218 (90%) | 22 | 2 | 8 hours |
| EmptyState updates | 81 | 57 (70%) | 22 | 2 | 2.5 hours |
| CSS variables & tokens | 56 | 56 (100%) | 0 | 0 | 2 hours |
| Interface renames | 12 | 11 (92%) | 1 | 0 | 0.4 hours |
| Other violation types | 97 | 80 (82%) | 14 | 3 | 3 hours |
| Totals | 3,557 | 3,085 (87%) | 422 | 50 | 113 hours |
Overall metrics:
- Automation rate: 87% (3,085 auto-fixed)
- Success rate: 99% (50 rejections / 3,557 total)
- Time investment: ~16 hours (review + edge case fixes)
- Time saved: 103 hours
- ROI: 7.4x (119 hours manual / 16 hours with AI)
Cost breakdown:
- AI API costs: ~$15 (Claude Sonnet)
- Developer time saved: 103 hours × $100/hour = $10,300
- Net savings: $10,285 (one-time migration cost)
Why Accuracy Matters: The Counterfactual
What if we had used simple text matching (20% false positives) instead of semantic analysis (5% false positives)?
With 20% false positives (text matching):
- Total “violations”: ~4,400 (including ~880 false positives)
- AI generates fixes for all 4,400
- 880 bad fixes applied automatically
- Scenario 1: Catch them in testing → Days of debugging
- Scenario 2: Don’t catch them → Bugs in production
- Scenario 3: Review everything manually → No time savings
Developer trust erodes:
“AI changed a comment, broke a test, and modified documentation. I can’t trust this tool anymore.”
With 5% false positives (semantic analysis):
- Total violations: 3,557 (only ~178 false positives)
- ~178 false positives typically flagged as low confidence or caught in review
- Manual review catches them before applying
- 95% of fixes are trustworthy
Developer trust builds:
“AI correctly fixed 3,085 violations automatically. I reviewed 422 cases and only rejected 50. This actually works.”
Bottom line: High-precision detection ENABLES AI automation. You can’t skip to AI fixes with low-quality violations.
Best Practices from 3,557 Fixes
1. Start Small - Test One Violation First
Before processing hundreds of violations, test the AI on a single file:
- Open the Issues view
- Expand a violation type (e.g., “Text component…”)
- Right-click on one file
- Click “Fix”
- Review the AI’s proposal in the Resolution Panel
This helps you understand how the AI approaches fixes before scaling up.
2. Process by Violation Type (Not All at Once)
Work through violations systematically:
Step 1: Simple CSS changes first
- Filter Issues view: “CSS class prefixes”
- Click “Fix” → Review → Accept
- Nearly 100% success rate on these
Step 2: Component renames
- Filter: “Text component should be replaced with Content”
- Click “Fix” → Review → Accept most
- ~98% success rate
Step 3: Complex refactorings last
- Filter: “EmptyState component structure has changed”
- Enable Agent Mode for these (more interactive)
- May need more manual adjustments
3. Use Version Control - One Violation Type Per Commit
Create a dedicated branch:
git checkout -b konveyor-ai-migration
Commit after each violation type:
# After accepting AI fixes for CSS changes
git add -A
git commit -m "AI fix: CSS class prefix migration (172 files)"

# After accepting AI fixes for Text → Content
git add -A
git commit -m "AI fix: Text component → Content (200+ files, 1,133 instances)"

# After accepting AI fixes for EmptyState
git add -A
git commit -m "AI fix: EmptyState component refactoring (45 files)"
Benefits:
- Easy to review each violation type’s changes
- Easy to rollback if needed
- Clear history of what was automated vs manual
4. Test Between Each Violation Type
After accepting AI fixes for a violation type, run tests before moving to the next:
# After accepting fixes
npm run test
npm run build
npm run lint

# If tests fail, investigate immediately
# Don't move to next violation type until tests pass
Why: Catches any edge cases the AI missed before compounding issues.
5. Use the “Edit Manually” Option When Needed
The Resolution Panel has three options for each fix:
- Accept Changes: AI fix is perfect, apply it
- Reject: Skip this file entirely
- Edit Manually: Open the file in the editor with AI’s suggestion visible
When to use “Edit Manually”:
- AI fix is close but needs tweaking
- You want to add additional changes while you’re at it
- Edge case requires human judgment
Example workflow:
- AI suggests changing Text → Content
- You notice a related issue in same file
- Click “Edit Manually”
- Apply AI’s change + your additional fix
- Save and move to next file
6. Monitor AI Interaction Messages
In Agent Mode, the Resolution Panel shows AI’s thought process:
🤖 Analyzing file...
   - Found 3 Text component usages
   - Checking for prop compatibility
   - Validating import statements
   - No breaking changes detected

✓ Safe to migrate all 3 instances
This transparency helps you trust (or question) the AI’s decisions.
Integration with CI/CD
Once you trust the automation, you can prevent new violations from being introduced by integrating detection into your CI/CD pipeline.
⚙️ Click to see CI/CD integration example
GitHub Actions Example
Add a workflow that fails PRs when new violations are detected:
# .github/workflows/migration-check.yml
name: Check for PatternFly v5 patterns

on: [pull_request]

jobs:
  migration-check:
    runs-on: ubuntu-latest
    steps:
      - uses: actions/checkout@v3

      - name: Run Konveyor Analyzer
        run: |
          kantra analyze \
            --input . \
            --rules patternfly-v5-to-v6.yaml \
            --output analysis-results

      - name: Check for violations
        run: |
          violation_count=$(grep -c "message:" analysis-results/output.yaml || true)
          if [ $violation_count -gt 0 ]; then
            echo "❌ Found $violation_count PatternFly v5 violations"
            echo "💡 Open in VS Code and use Konveyor extension to generate AI fixes"
            exit 1
          fi
This prevents new v5 patterns from being merged while you’re migrating to v6.
Limitations and Edge Cases
What AI Handles Well
✅ Direct component renames:
Text → Content
Chip → Label
Tile → Card
✅ Import statement updates:
import { Text } from '@patternfly/react-core'
→ import { Content } from '@patternfly/react-core'
✅ CSS pattern replacements:
--pf-v5-global--Color--100
→ --pf-t--global--color--100
✅ Multiple usages in same file:
<Text component="h1">{title}</Text>
<Text component="p">{desc}</Text>
→ All updated correctly
What Needs Manual Review
⚠️ Dynamic imports:
const component = await import(`@patternfly/react-core/${name}`);
// AI can't confidently modify string templates
⚠️ Compatibility layers:
const TextComponent = isV6 ? Content : Text;
// Intentional use of both - don't change
⚠️ Test mocks:
jest.mock('@patternfly/react-core', () => ({
  Text: jest.fn()
}));
// Mocks need different handling
⚠️ Custom wrappers:
export const MyText = (props) => <Text {...props} />;
// May want to keep wrapper name same
Known Issues
-
Multi-file refactorings: AI processes files independently. If a change requires coordinating updates across files, manual review needed.
-
Type definition updates: AI fixes component usage but may miss corresponding TypeScript type updates.
-
Documentation/comments: AI generally skips updating comments referencing old component names (you may want this).
What’s Coming: Konveyor AI Roadmap
Konveyor AI is under active development. The VS Code extension and Standard Mode work well today, while advanced features like Agent Mode and repository-level understanding are coming in Q2 2025.
🗺️ Click to see current capabilities and planned enhancements
Current Capabilities (Available Now)
| Feature | Status | Notes |
|---|---|---|
| VS Code Integration | ✅ Functional | Issues view → Fix workflow works |
| RAG (Solution server patterns) | ✅ Functional | Uses migration patterns from solution server |
| Basic AI fixes | ✅ Functional | Standard Mode generates fixes |
| Agent Mode (Basic) | 🟡 Partial | Minimal happy path implemented |
| External Tool Integration | 🟡 Partial | Validators exist but limited |
Planned Enhancements (Q2 2025)
Repository-Level Understanding: Currently, Kai processes files independently. The roadmap includes:
- Understanding cross-file dependencies
- Planning refactorings that cascade across multiple files
- Executing multi-file changes atomically
- Remediating errors that span file boundaries
Example future capability:
Scenario: Renaming a component used in 50 files

Current: Process each file independently
Future:
  1. Analyze all 50 files to understand dependencies
  2. Plan the migration (order matters)
  3. Execute changes across all files
  4. Validate that inter-file references still work
  5. Remediate any cross-file errors
Enhanced Agent Workflow:
- Better integration with linters, compilers, and test runners
- Iterative refinement until all external validators pass
- Support for custom validators (your org’s specific tools)
- AI Gateway/Proxy integration for enterprise credential management
How to Stay Updated
Konveyor AI is evolving rapidly. To track progress:
- GitHub: Watch the Konveyor AI repo for updates
- Community Meetings: Join the Konveyor community calls
- Slack: #konveyor on Kubernetes Slack
Want to influence the roadmap? Konveyor is looking for early access partners to validate features and provide feedback. Contact the team through GitHub issues or Slack.
Conclusion: The Complete Automation Pipeline
Konveyor AI transforms PatternFly migrations from weeks to days:
The Complete Pipeline: 3,557 violations fixed with 87% automation
| Step | Tool | Input | Output | Time |
|---|---|---|---|---|
| 1. Rule Generation | AI from docs | Migration guides | 230 rules (50 files) | ~30 min |
| 2. Detection | Semantic analysis | Codebase + rules | 3,557 violations (95% accurate) | ~25 min |
| 3. Automation | Konveyor AI | Violations | 3,085 auto-fixes + 472 to review | ~16 hours |
| Manual (old way) | Grep + manual edits | Codebase | 3,557 fixes | ~119 hours |
Total time: 17 hours vs 119 hours = 102 hours saved
Success metrics:
- 99% of fixes were correct (50 rejections / 3,557 total)
- 87% automation rate (3,085 / 3,557 auto-fixed)
- $15 in AI costs vs $10,300 in developer time saved
Key Lessons
-
Accuracy enables automation: High-precision detection (95%) is critical for AI automation to work.
-
Progressive trust: Start conservative, build confidence with each successful batch.
-
AI is a tool, not magic: Still need developer review for edge cases. But 87% automation is transformative.
-
The math works: Even at $100/hour developer time, saving 102 hours pays for itself massively.
What We Didn’t Cover
This article focused on UI component migrations (PatternFly). The same automation approach works for:
- React Router v5 → v6
- Material-UI v4 → v5
- Angular upgrades
- Vue 2 → Vue 3
- Any framework with migration documentation
The ruleset generation process is covered in Part 1, or you can use existing rulesets from the Konveyor rulesets repository.
Next Steps
For PatternFly migrations:
-
Try the automation on your codebase:
Step 1: Clone the rulesets
git clone https://github.com/konveyor/rulesets.gitStep 2: Run analysis
kantra analyze \
  --input /path/to/your/project \
  --rules rulesets/preview/nodejs/patternfly \
  --output analysis-results
Step 3: Generate AI fixes in VS Code
- Open your project in VS Code
- Install the Konveyor extension
- Open the Issues view
- Right-click on a violation type → “Fix”
- Review AI-generated fixes in Resolution Panel
- Accept or reject changes
-
Share your results: How many violations? Automation rate? Time saved? Help improve the tools.
-
Contribute: Found edge cases? Submit PRs to the rulesets repository or Konveyor extension.
For other framework migrations:
- Check the Konveyor rulesets repository for existing rulesets
- If none exist, generate rules from migration docs (see Part 1 for how)
- Share your rulesets back with the community
Resources
Migration Automation Series:
- Part 1: Generating Migration Rules with AI - How to create rulesets from framework docs
- Part 2: Improving Detection with Semantic Analysis - Achieving 95% detection precision
- Part 3: Automating Fixes with Konveyor AI (this post) - AI-assisted refactoring at scale
Tools & Rulesets:
- Konveyor AI - AI-assisted code refactoring engine
- Konveyor Rulesets - Official migration rulesets repository
- PatternFly v5→v6 - 230 rules across 50 files
- Konveyor Analyzer - Semantic code analysis platform
Start Your Migration Today
Don’t spend another week on manual refactoring.
You’ve seen how Konveyor AI transformed a 119-hour migration into just 16 hours with 99% accuracy. Now it’s your turn.
Get Started Now
1. Quick Start (5 minutes):
# Install VS Code extension
# Search "Konveyor" in Extensions marketplace

# Configure AI provider
# Analysis View → Configure GenAI Settings → Add API key

# Run your first analysis
# Analysis View → Run Analysis → Get AI fixes
2. For PatternFly migrations:
- Use the official 230-rule PatternFly v5→v6 ruleset
- Follow the phase-by-phase guide in this article
- Start with simple renames, build confidence, then tackle complex changes
3. For other frameworks:
- Check existing rulesets for your migration
- Or generate custom rules from documentation (Part 1)
Share Your Success
- Tweet your time savings with #KonveyorAI @konveyor
- Open issues for edge cases on GitHub
- Join the community on Kubernetes Slack #konveyor
Questions?
- Konveyor Community Calls - Monthly demos and Q&A
- Documentation - Official guides
- GitHub Discussions - Ask the community
The best time to automate was yesterday. The next best time is now.
Have questions or want to share your migration results? Open an issue on the Konveyor AI repository or join the discussion on Kubernetes Slack #konveyor.